Monday, July 30, 2012

How to Make Your Eyes Look Bigger

So this is my very first "how to" tutorial post. My equipment is extremely amateur so please don't hold the horrible yellow lighting and my iPhone camera against me (or my lovely model Orit who in fact doesn't look bright red in real life)!

I wanted to do a step-by-step with pictures for people who have hooded eyes, smaller eyes, or for anyone who wants to try a dramatic eye shadow technique that really emphasizes your eyes. This technique is called "cutting your crease" (which I think sounds a little gross) but what you are doing is quite literally outlining the crease of your lid with a dark color. The line remains harsh (I repeat DO NOT BLEND) in order to give a very defined lid - this is especially helpful for people who have hooded eyes and therefore their crease gets lost all together. So without further ado, here are the horrendously low quality pictures to demonstrate:

1. Apply an eyelid primer so that the shadows will go on and stay put. It's important to use eyeshadows that don't bleed or have lots of "fall out" for this look since the lines are intended to be sharp.

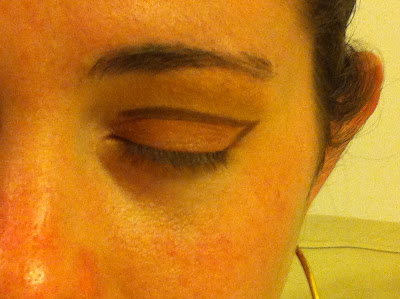
2. Apply a light but pigmented shadow on the lid. Here I'm using a matte peach color by Lancome. Best to use a flat shader or concealer brush and pack this shadow on layer by layer. Do your best to stay beneath the crease - just cover the lid.

3. Using an angled liner brush, outline your crease sharply with a dark colored eye shadow. You want to keep this line as defined and sharp as possible so take your time. To get the right angle from your lash line, it helps to hold a brush up to the outer edge of your eye and line it up with the end of your eyebrow. That is the angle that you should use to connect your crease line with your lash line.
 And here's a close up:

4. Blend the outer edge of the line but do not touch the inner edge (the one along your lid that connects with the lighter shadow).

5. Use your favorite eye liner, curl lashes, and apply mascara. Then apply your foundation and use your foundation brush to further sharpen the angle of your eyeshadow. You can even apply some concealer on your brow bone as a highlighter and blend it to make sure that the dark eyeshadow from your crease isn't too high (a dark crease color shouldn't go all the way up the brow bone).

6. Add some blush and lip gloss and Tada!

The effect is a large, open eye with a very defined crease. It's a great technique because it works with all different shadow colors. The only rule is something light and bright on the lid and then something dark and not glittery or powdery for the crease. I definitely recommend YouTube-ing this technique (cutting your crease) as there are many talented people out there with great color scheme ideas for this look. I hope this was helpful! Have a wonderful day!


Fun with Lighting!

When photographer Yirmi Vann got in touch with me about a project, I was immediately excited. I know this guy's work and he is all about the lighting. He runs a photography school and wanted to give his students an opportunity to do a beauty photo shoot in a studio. My enthusiasm and excitement for the shoot paid off - Yirmi quickly saw that along with Chany Nussensweig (hair stylist extraordinaire) and hair and makeup artist Miriam Ciner, it was going to be a great opportunity to get some fantastic shots himself. Chany and I styled three models, each with a different theme.

Our first theme was Barbie. Our gorgeous model had large eyes, heart shaped lips, and killer cheekbones. Perfect for a life-size Barbie. On her eyes I used pinks, purples, and a little blue. I lined her eyes with a thick black liner, and applied full false lashes to give her a doll-like appearance. I mixed her foundation with a liquid highlighter to make her skin look almost plastic and flawless. I used a very bubble-gum pink blush and applied a neon pink lipstick with clear gloss.


The second look was a dreamy, ethereal goddess. I used gold, pinks, and brown shadows on the eyes. Dark brown liner and a few sparse false lashes to create a blended but dramatic look. I made the gorgeous model a slightly tanner version of herself using a foundation a tiny bit darker than her skin and also with lots of bronzer and contouring. Instead of using a blush, I used a gold-toned bronzer on the apples of her cheeks to enhance the gold goddess look. To create a nude lip I first covered her lips in a layer of foundation, then lined her lips with a light pink pencil, and applied a peach gloss over the foundation. 


The last theme was a dramatic, rocker chick look with a blue and turquoise eye. The pictures of the model were mostly taken by the students and we're still waiting for the shots, but Yirmi did manage to capture some beautiful shots off the set. I used two different turquoise and teal colors, a very light lilac purple, and a deep navy blue on her eyes. I lined her upper and lower lash line with the same navy eye shadow using a wet angled liner brush. I used a rose blush and peach lipstick with a clear gloss on top.


Overall we had an amazing night - lots of creativity, gorgeous girls, and pizza :).
More pics to come from this shoot when the students send us their shots.
Have a wonderful day!


Peach Makeup for an Engagement Shoot

For this beautiful bride-to-be I went extremely natural and used peach-toned shadows, blush, and a rosy lipstick. She wanted to make sure that she really looked and felt "like herself" so to avoid a feeling of being "made up" I applied a very thin layer of foundation, set the foundation with a mineral powder, and using a very light bronzer, I warmed up her face by contouring her cheekbones, temples, and the sides of her forehead. For her eyes I used gold, peach, and warm brown with lots of blending to keep the look natural. She was up for a more intense liner. So after applying a black gel liner I went over it with a brown shadow so that it would blend into her lids more naturally. I then applied a peach-coral blush and a dusty rose lipstick with a bit of gloss. Take a look!
(photos courtesy of Sigala Photography)


I think the overall look was natural and lovely. Warm, sunny, and feminine. Just like Laura!
<3
Have a wonderful day!


Thursday, June 21, 2012

Smokey Eyed Drama in Denver

The second I saw Gaby I thought "That is one gorgeous girl." But then I started to get to know her... and her warmth, optimism, and sweetness made her even more beautiful. For her photo shoot, I was honored to work with photographer Alyssa Kapnik  who really listened to my vision of how I wanted the makeup portrayed in order to highlight the dramatic eyes, and killer cheekbones of our model. I wanted to create a purple smokey eye that was intense, but wearable. You can see from the variety of pictures how different the exact same makeup can look depending on the lighting and editing. There were no touch-ups done between shots. So take a look!


So I've gotten some feedback from you guys that you would like a more step-by-step explanation for how to create the looks I'm posting instead of running through the basics and giving a product list. I can't promise I'll do that for each look, but for this one, I think it would be really fun to try on yourself and it's actually relatively simple so I'll break down what I did on her eyes in 10 steps:
1. Cover lid with an eye primer (I used the Benefit Stay Don't Stray)
2. Use a black eyeliner pencil along the outer half of the lid and smudge it up with blending brush or your fingertip. You want to blend it up to the crease so that it's darker along the lashes and lighter at the crease.
3. Use a light shimmery pink or peach on the inner corner of the eye lid (I used one of those pinky-beige colors in the Naked Palette from Urban Decay).
4. Use a matte, deep but not dark purple on the middle of the lid (I used MAC Fig).
5. Use a dark purple on the outer corner of the lid and sweep it up into the crease, creating a relatively slanted (but blended) outer V (I used MAC Blackberry).
6. Blend all of those colors together very well and buff out the harsh lines by using a skin-colored shadow along the edges of the dark purple. This is how you make it "smokey."
7. Using a black eyeshadow (I used the black from my Estee Lauder palette) go over the outer V subtly to make it even darker and more dramatic. But blend it out so that it doesn't look separate - you want all of the shadows to meld together.
8. Use the dark purple along the outer lash line on the bottom of the eye. Smoke it out.
9. Line the lower lash line with a *waterproof black eyeliner pencil (I used Urban Decay's 24/7)
10. Sweep a little bit of glitter across the whole lid (I used Bella Terra glitter pigment in Glamour - a burgundy glitter)
10. Apply false lashes! Or to keep it a little bit less "editorial" just curl your own lashes and apply some seriously thick mascara.

Give it a shot and let me know how it goes! Hope you have a wonderful day!


Wednesday, June 6, 2012

Chic Makeup for a Forest Photo Shoot

Chany asked me to create a dramatic look for her photo shoot with her husband (with the spectacular Sigala Photography). It was so much fun getting creative with colors, and highlighting her absolutely stunning features.


Face: Chany wanted the look to be a little retro, classy, and ladylike so I used a very matte finished foundation a shade lighter than her natural color to give her that stylized "porcelain doll" look. Using a very light hand, I applied concealer under the eyes and brightened up any red areas. Using a golden bronzer I warmed up her face under the cheekbones, along the temples, and on the sides of her forhead. I then used a highlighter on the middle of her forhead, down the bridge of her nose, and on the very tops of her cheekbones to give her face a lot of dimension and make sure that her features would look very clear in the photos. I used a very rosy blush to the apples of her cheeks. 

Eyes: I created a smokey eye that slanted slightly upwards to give her a romantic and mysterious look. I used a golden color on the lid, a deep burgundy in the crease, and a chocolate brown for the outer V. I also used a warm, rosy pink to blend the colors all together. I used a black gel liner along her upper lashline and a black pencil on her lower lashline. **TIP: I did not line her "waterline" because that often makes eyes appear smaller and squinty. 
I also filled her eyebrows in with a light brown brow pencil.

Lips: I first lined her lips with a nude pencil, then I used a peachy pink color lipstick, and topped it off with a very glossy babydoll pink gloss.

I will give a list of products used for the shoot soon!

I hope you guys enjoyed these pictures and if you want any tips or have questions about this look, don't hesitate to be in touch with me!
Have a wonderful day...


Thursday, May 24, 2012

The Best Eye Shadow for Your Eye Color

Many women don't know where to start when they sit down to do their makeup (or to have their makeup done). There are several factors in determining the best makeup for you - but a big one (and an easy one to learn about) is that your unique eye color can be "brought out" or emphasized based on the color of eye shadow that you use. Now please whatever you do, don't lather on a single eye shadow across your entire eye area based on this post! In a different post I'll talk about where exactly you want to put the eye shadow. Here, we're just going to discuss the general colors that will make your eyes pop. The cool thing about having a background in art, is that I already knew makeup color theory before I learned about it.

The best way to learn about makeup color theory is to look at a color wheel. Like this one:
The basic principle with color (if you have any background in art, you'll know this) is that the colors directly opposite of one another are the most contrasted and complimentary. The colors closest to one another can also create a nice "matching effect" but they will not create a contrast. What you want to do with your eye makeup, is create a contrast in order to highlight your eyes and make that color "pop." Let's talk specifics...

BROWN EYES
Figure out more specifically where your brown eyes are on the color wheel. If they have a gold or yellow tint we would put them around the "rust" color on our wheel above. If they have a green or blue tint we would put them around the "olive" color on the wheel. Then look directly across the wheel and see where you land. Now obviously, you're not going to want to cover your eyelids in neon red. But if your eyes are around the "olive" color, burgundy and reddish brown shadows will look amazing with your eyes. Let's check out some celebrity examples:

Jennifer Lopez has brown eyes that have a very orange (almost red) tint (let's place her eyes near "rust" on our color wheel). Her shadows are cool-toned (blues and silvers). Natalie Portman's eyes are cooler, they have a violet (purplish) tint (let's place her between "maroon" and "plum" on our color wheel). Direct contrast for her are warm tones. Her eye shadow colors here are orange and brown. Now obviously the subtle difference between these two women in eye color is so slight that they would both look amazing in one another's eye shadow. But for the sake of this post, I'm pointing out tiny differences to make a point.

GREEN EYES
Again, find which side of the green spectrum your eyes are and look directly across. 


Drew Barrymore is wearing purple shadow with a slight burgundy tint. The clever stylist in this ad even added a purple piece of fabric to further highlight her green eyes (and purple earrings too).

Scarlett Johansson's eyes are a bit bluer on the green spectrum so she's wearing yellow tinted shadows (peach and gold).

BLUE EYES
Blue is fun because you can kind of make anything work. Let's look at the celebs for tips:
                                                                              
Blake Lively and Megan Fox are both wearing warm-toned makeup (browns, gold, peach) which is directly across from blue on the color wheel. It's the classic contrast for blue eyes and always works. If you look closely, Blake's eyes are greener and her shadow is slightly redder, while Megan's eyes are more violet and her shadow is slightly yellower. Tiny differences, but they make a difference.

Ok ladies! So find your eye color on the color wheel and find the shadows that will make your eyes pop. I hope this was helpful. Have a wonderful day!


Wednesday, May 23, 2012

"Natural Makeup Please!"

When most women say they want their makeup to look natural, what they really mean is "make it look like I'm naturally flawless, but not wearing makeup." What they don't mean is "I really like my pimples, please make sure they're visible. Oh, and the bags under my eyes are important to me."

Any time that you see a celebrity looking incredible natural and not "made up" let me promise you, she is wearing a lot of makeup. That being said, I completely respect the desire of many women to look "natural." On a very basic level, this means using as little foundation as possible, making sure the blush and all products on the face are blended very smoothly, and that the colors used on the eyes are neutrals and not applied in a harsh or conspicuous way.

Last week I was honored to do Jenna's makeup, a bride-to-be who likes "minimal makeup" (in her own words) and wanted to look radiant for her engagement photo-shoot (by Sigala Photography). Since she's absolutely gorgeous, it wasn't too difficult to stick with her desire to stay natural.


Eyes: I used a very light beige shadow, slightly lighter than her skin color on her lid and then used a darker beige along the entire crease. I used a warm brown shadow on the very outer "v" of her eyelid to give her eyes a bit of definition in a subtle way. I then used a warm pink shadow with a tiny bit of shimmer over her entire lid, concentrating on the inner corner of her eye. Instead of using an eye liner, I used a burgundy eye shadow (applied with a damp eye liner brush) along her upper and lower lash line so that it would look seamless and not at all like she was actually wearing eye liner. I used a eye lash primer before applying mascara to make her lashes a bit fuller and appear longer.
(Products: Benefit eye primer, Lancome Divine Hold eyeshadow palette in Desert, MAC eyeshadow Da Bling, MAC eye shadow Twinks)

Face: I applied a thin layer of moisturizer on her face to give her a dewy glow. Jenna did not need a full face of foundation so I used a concealer brush to cover up only the areas that needed some coverage and blended it well. I used a powder foundation and dusted it lightly over her face to even it all out. I applied a little bit of bronzer under her cheek bones, and a peach colored blush onto the apples of her cheeks. I also applied an illuminating highlighter along the tops of her cheekbones and down the bridge of her nose.
(Products: Clinique Even Better corrector makeup, Bella Terra mineral foundation in #2, I.D. bronzer in Glow, L'Oreal matte blush in Peachy Perfect, MAC skinfinish highlighter in Precious Pearl)

It was a pleasure working with such a gorgeous and sweet person. Hope you all enjoyed the makeup info and pictures. Have a wonderful day!