Monday, July 30, 2012

How to Make Your Eyes Look Bigger

So this is my very first "how to" tutorial post. My equipment is extremely amateur so please don't hold the horrible yellow lighting and my iPhone camera against me (or my lovely model Orit who in fact doesn't look bright red in real life)!

I wanted to do a step-by-step with pictures for people who have hooded eyes, smaller eyes, or for anyone who wants to try a dramatic eye shadow technique that really emphasizes your eyes. This technique is called "cutting your crease" (which I think sounds a little gross) but what you are doing is quite literally outlining the crease of your lid with a dark color. The line remains harsh (I repeat DO NOT BLEND) in order to give a very defined lid - this is especially helpful for people who have hooded eyes and therefore their crease gets lost all together. So without further ado, here are the horrendously low quality pictures to demonstrate:

1. Apply an eyelid primer so that the shadows will go on and stay put. It's important to use eyeshadows that don't bleed or have lots of "fall out" for this look since the lines are intended to be sharp.

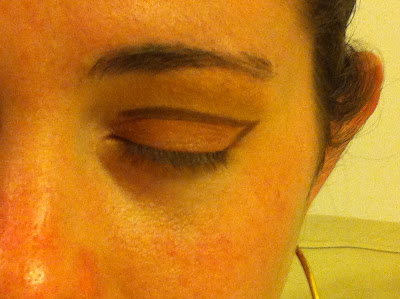
2. Apply a light but pigmented shadow on the lid. Here I'm using a matte peach color by Lancome. Best to use a flat shader or concealer brush and pack this shadow on layer by layer. Do your best to stay beneath the crease - just cover the lid.

3. Using an angled liner brush, outline your crease sharply with a dark colored eye shadow. You want to keep this line as defined and sharp as possible so take your time. To get the right angle from your lash line, it helps to hold a brush up to the outer edge of your eye and line it up with the end of your eyebrow. That is the angle that you should use to connect your crease line with your lash line.
 And here's a close up:

4. Blend the outer edge of the line but do not touch the inner edge (the one along your lid that connects with the lighter shadow).

5. Use your favorite eye liner, curl lashes, and apply mascara. Then apply your foundation and use your foundation brush to further sharpen the angle of your eyeshadow. You can even apply some concealer on your brow bone as a highlighter and blend it to make sure that the dark eyeshadow from your crease isn't too high (a dark crease color shouldn't go all the way up the brow bone).

6. Add some blush and lip gloss and Tada!

The effect is a large, open eye with a very defined crease. It's a great technique because it works with all different shadow colors. The only rule is something light and bright on the lid and then something dark and not glittery or powdery for the crease. I definitely recommend YouTube-ing this technique (cutting your crease) as there are many talented people out there with great color scheme ideas for this look. I hope this was helpful! Have a wonderful day!




Fun with Lighting!

When photographer Yirmi Vann got in touch with me about a project, I was immediately excited. I know this guy's work and he is all about the lighting. He runs a photography school and wanted to give his students an opportunity to do a beauty photo shoot in a studio. My enthusiasm and excitement for the shoot paid off - Yirmi quickly saw that along with Chany Nussensweig (hair stylist extraordinaire) and hair and makeup artist Miriam Ciner, it was going to be a great opportunity to get some fantastic shots himself. Chany and I styled three models, each with a different theme.

Our first theme was Barbie. Our gorgeous model had large eyes, heart shaped lips, and killer cheekbones. Perfect for a life-size Barbie. On her eyes I used pinks, purples, and a little blue. I lined her eyes with a thick black liner, and applied full false lashes to give her a doll-like appearance. I mixed her foundation with a liquid highlighter to make her skin look almost plastic and flawless. I used a very bubble-gum pink blush and applied a neon pink lipstick with clear gloss.


The second look was a dreamy, ethereal goddess. I used gold, pinks, and brown shadows on the eyes. Dark brown liner and a few sparse false lashes to create a blended but dramatic look. I made the gorgeous model a slightly tanner version of herself using a foundation a tiny bit darker than her skin and also with lots of bronzer and contouring. Instead of using a blush, I used a gold-toned bronzer on the apples of her cheeks to enhance the gold goddess look. To create a nude lip I first covered her lips in a layer of foundation, then lined her lips with a light pink pencil, and applied a peach gloss over the foundation. 


The last theme was a dramatic, rocker chick look with a blue and turquoise eye. The pictures of the model were mostly taken by the students and we're still waiting for the shots, but Yirmi did manage to capture some beautiful shots off the set. I used two different turquoise and teal colors, a very light lilac purple, and a deep navy blue on her eyes. I lined her upper and lower lash line with the same navy eye shadow using a wet angled liner brush. I used a rose blush and peach lipstick with a clear gloss on top.


Overall we had an amazing night - lots of creativity, gorgeous girls, and pizza :).
More pics to come from this shoot when the students send us their shots.
Have a wonderful day!


Peach Makeup for an Engagement Shoot

For this beautiful bride-to-be I went extremely natural and used peach-toned shadows, blush, and a rosy lipstick. She wanted to make sure that she really looked and felt "like herself" so to avoid a feeling of being "made up" I applied a very thin layer of foundation, set the foundation with a mineral powder, and using a very light bronzer, I warmed up her face by contouring her cheekbones, temples, and the sides of her forehead. For her eyes I used gold, peach, and warm brown with lots of blending to keep the look natural. She was up for a more intense liner. So after applying a black gel liner I went over it with a brown shadow so that it would blend into her lids more naturally. I then applied a peach-coral blush and a dusty rose lipstick with a bit of gloss. Take a look!
(photos courtesy of Sigala Photography)


I think the overall look was natural and lovely. Warm, sunny, and feminine. Just like Laura!
<3
Have a wonderful day!